Note: Users doing field registrations are expected to be familiar with the Job Codes, Condition Codes, and Qualifiers as found in the AAR Field Manual Rules 36, 41, 43, and 44. CEPM validates Job Codes and its related qualifiers and Condition Codes. Use the CEPM Data Specification Manual as needed.
Inventoried components (manufactured pre-CEPM without barcodes) can be registered using other characteristics using the Field Registration function.
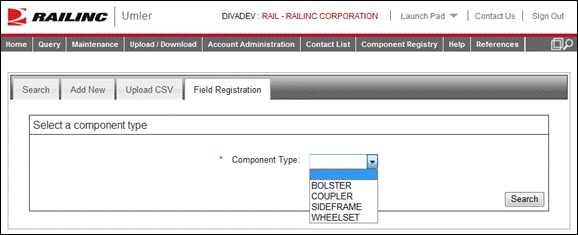
Exhibit 36. Field Registration Select a Component Type
1. Select the Component Type from the drop-down and select Search.
a. For Bolsters, continue with Bolsters.
b. For Couplers, continue with Couplers.
c. For Side Frames, continue with Sideframe.
d. For Wheelsets, continue with Wheelsets.
Exhibit 37. Search if Bolster is Registered
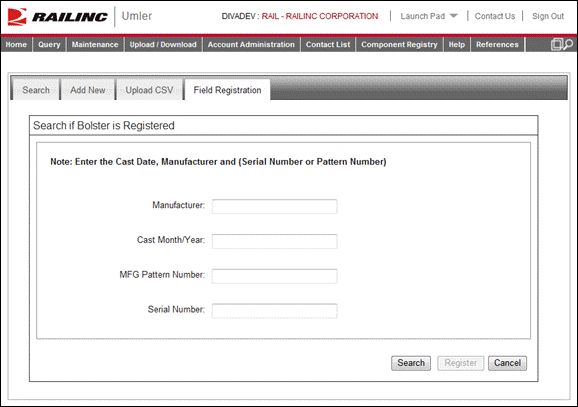
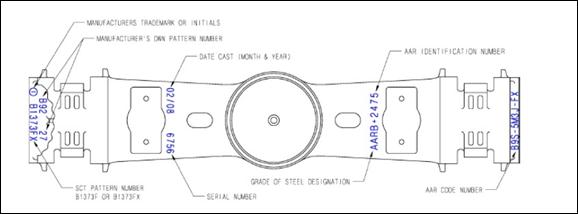
Exhibit 38 shows where needed information can be found on the bolster.
Exhibit 38. Bolster Reference Diagram
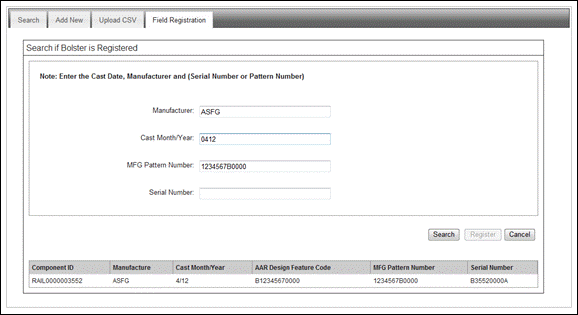
1. Type in the Manufacturer and Cast Month/Year. Select the trademark lookup icon (![]() ) to open the Trademark Select panel to select the Manufacturer (refer to Exhibit 22).
) to open the Trademark Select panel to select the Manufacturer (refer to Exhibit 22).
2. Type in the Cast Month/Year.
3. Enter one of the following:
a. MFG Pattern Number, or
b. Serial Number
4. Select Search.
a. If a matching component is found (Exhibit 39), no field registration is necessary and the bolster can be associated with the Equipment ID as described in Bolster Association.
Exhibit 39. Field Registration Search (Component found)
b. If no matching component is found (Exhibit 40), select Register. The Field Registration Elements panel is displayed (Exhibit 41).
Exhibit 40. Field Registration Search (No Component found)

Exhibit 41. Field Registration Elements (Bolsters)
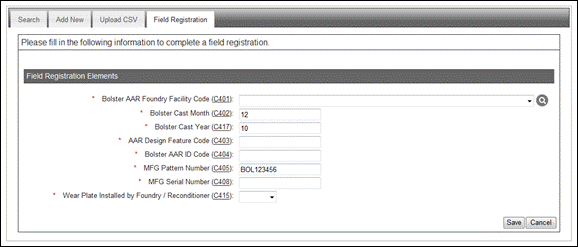
5. Complete all required elements for the bolster.
6. When all mandatory data is completed, select Save.
a. If validation fails, an error message is shown beside the invalid entry (Exhibit 42).
Exhibit 42. Field Registration (with validation error)
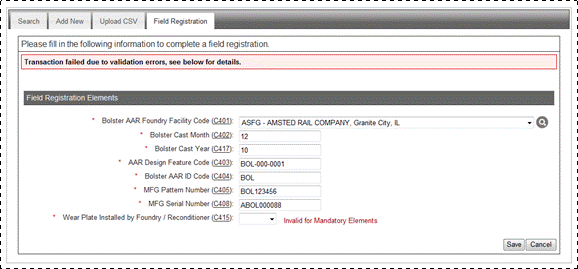
In Exhibit 42, a mandatory field was not completed.
b. If validation is successful, CEPM generates a unique bolster component ID (Exhibit 43).
Exhibit 43. Field Registration (Success message for Bolster)
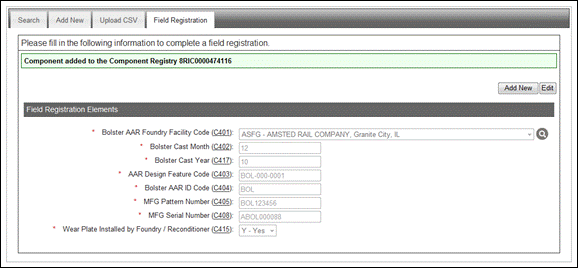
In Exhibit 43, the new component ID shown is 8RIC0000474116. The bolster can now be associated with an Equipment ID as described in Bolster Association.
To add another bolster registration, select Add New. The Search if Bolster is Registered panel is displayed (Exhibit 37).
Exhibit 44. Search if Coupler is Registered
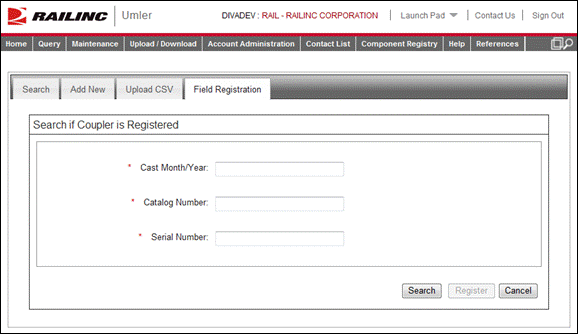
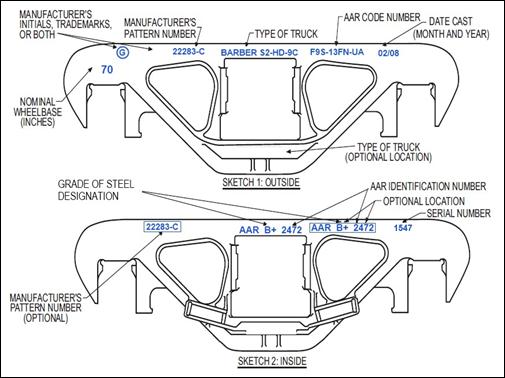
Exhibit 45 shows where needed information can be found on the coupler.
Exhibit 45. Coupler Reference Diagram

1. Type in the Cast Month/Year.
2. Enter the Catalog Number.
3. Enter the Serial Number.
4. Select Search.
a. If a matching component is found (similar to Exhibit 39), no field registration is necessary and the coupler can be associated with the Equipment ID as described in Coupler Association.
b. If no matching component is found (similar to Exhibit 40), select Register. The Field Registration Elements panel is displayed (Exhibit 46).
Exhibit 46. Field Registration Elements (Couplers)
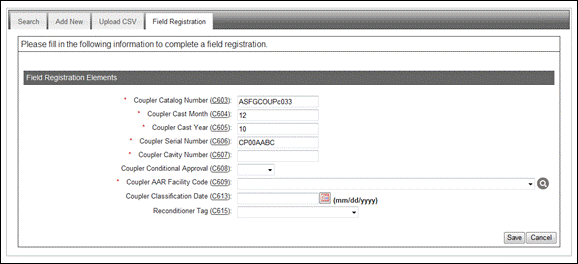
5. Complete all required elements for the coupler.
6. When all mandatory data is completed, select Save.
a. If validation fails, an error message is shown beside the invalid entry (similar to Exhibit 42).
b. If validation is successful, CEPM generates a unique coupler component ID (Exhibit 47).
Exhibit 47. Field Registration (Success message for Couplers)
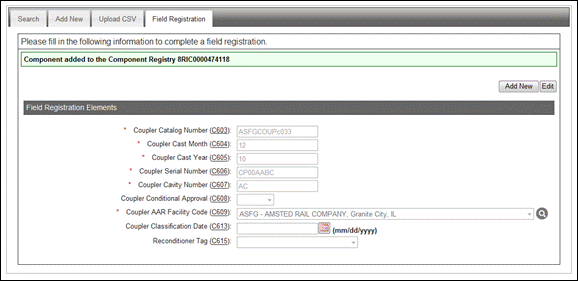
In Exhibit 47, the new component ID shown is 8RIC0000474118. The coupler can now be associated with an Equipment ID as described in Coupler Association.
To add another coupler registration, select Add New. The Search if Coupler is Registered panel is displayed (Exhibit 44).
Exhibit 48. Search if Sideframe is Registered

Exhibit 49 shows where needed information can be found on the side frame.
Exhibit 49. Side Frame Reference Diagram
1. Type in the Manufacturer.
2. Type in the Cast Month/Year.
3. Enter one of the following:
a. Enter the MFG Pattern Number.
b. Enter the Serial Number.
4. Select Search.
a. If a matching component is found (similar to Exhibit 39), no field registration is necessary and the side frame can be associated with the Equipment ID as described in Side Frame Association.
b. If no matching component is found (similar to Exhibit 40), select Register. The Field Registration Elements panel is displayed (Exhibit 50).
Exhibit 50. Field Registration Elements (Sideframes)
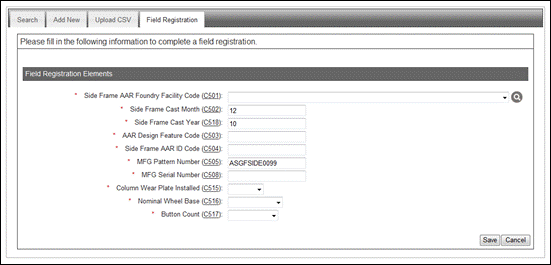
5. Complete all required elements for the sideframe. Select the trademark lookup icon (![]() ) to open the Trademark Select panel to select the Manufacturer (refer to Exhibit 22)
) to open the Trademark Select panel to select the Manufacturer (refer to Exhibit 22)
6. When all mandatory data is completed, select Save.
a. If validation fails, an error message is shown beside the invalid entry (similar to Exhibit 42).
b. If validation is successful, CEPM generates a unique sideframe component ID (Exhibit 51).
Exhibit 51. Field Registration (Success message for Sideframe)
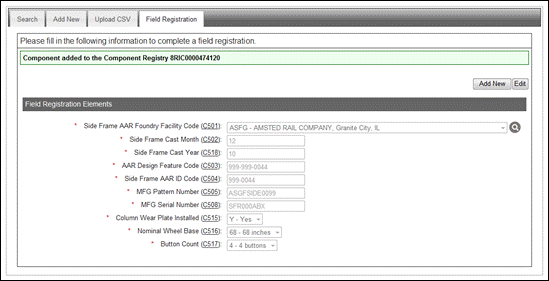
In Exhibit 51, the new component ID shown is 8RIC0000474120. The sideframe can now be associated with an Equipment ID as described in Side Frame Association.
To add another sideframe registration, select Add New. The Search if Sideframe is Registered panel is displayed (Exhibit 48).
Exhibit 52. Search if Wheelset is Registered
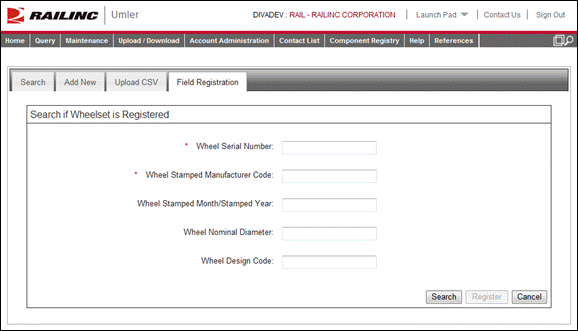
7. Type in the Wheel serial Number and the Wheel Stamped Manufacturer Code.
8. (optional) Enter any of the other available criteria:
a. Wheel Stamped Month/Stamped Year
b. Wheel Nominal Diameter
c. Wheel Design Code
9. Select Search.
a. If a matching component is found (similar to Exhibit 39), no field registration is necessary and the wheelset can be associated with the Equipment ID as described in Wheelset Association.
b. If no matching component is found (similar to Exhibit 40), select Register. The Field Registration panel is displayed (Exhibit 53).
Exhibit 53. Field Registration for Wheelset (top)
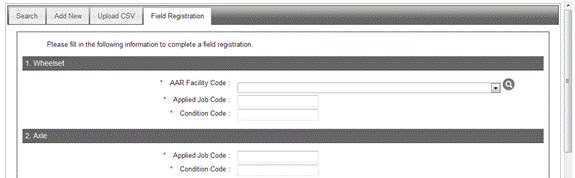
10. Complete Section 1. Wheelset (Rule 44):
a. AAR Facility Code—The AAR Facility Code is the QA Code for the wheel shop that pressed the wheelset. Use the Mechanical Inspection Department (MID) Code found on the wheelset locking plate to determine the QA Code. Use the MID lookup icon (![]() ) to select the matching code (Exhibit 54).
) to select the matching code (Exhibit 54).
Exhibit 54. MID Search
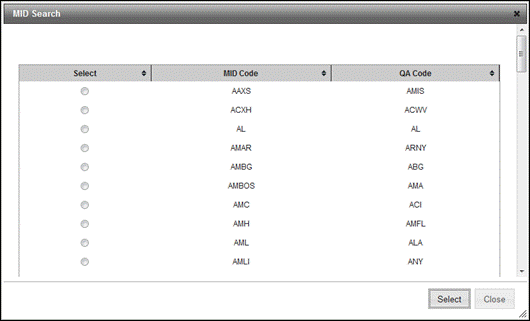
Scroll to the desired MID Code, select the radio button to the left, and select Select. The panel closes and the selection is in the AAR Facility Code field.
b. Applied Job Code—must be valid 4-digit AAR Job Code for Wheelsets
c. Condition Code—must be valid 1-digit code for wheelsets
11. Complete Section 2. Axle (Rule 43):
a. Applied Job Code—must be valid 4-digit AAR Job Code for Axles
b. Condition Code—must be valid 1-digit code for axles
Exhibit 55. Field Registration for Wheelset (middle)
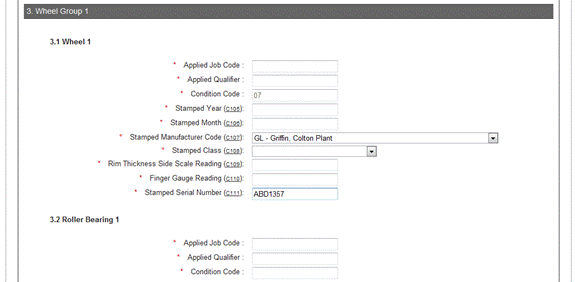
12. Complete Section 3.1 Wheel Group 1 (Wheel 1) [Rule 41]:
Note: Select the element link to view element help in a new window. Close the window when finished with the help. Elements with a red dot (●) are mandatory. Data Types: Text, Numeric, or Timestamp/Date.
a. Applied Job Code—must be valid 4-digit AAR Job Code for Wheels.
b. Applied Qualifier—must be valid 2-digit qualifier for the appropriate wheel group.
c. Condition Code—defaults to 7 (all wheels applied).
d. Stamped Year—Select the C105 link as needed for help.
e. Stamped Month—Select the C106 link as needed for help.
f. Stamped Manufacturer Code (filled from user search input)—Select the C107 link as needed for help.
g. Stamped Class—Select the C108 link as needed for help.
h. Rim Thickness Side Scale Reading—Select the C109 link as needed for help.
i. Finger Gauge Reading—Select the C110 link as needed for help.
j. Stamped Serial Number (filled from user search input) —Select the C111 link as needed for help.
13. Complete Section 3.2 Wheel Group 1 (Roller Bearing 1) [Rule 36]:
a. Applied Job Code—must be valid 4-digit AAR Job Code for Roller Bearings
b. Applied Qualifier—must be valid 2-digit qualifier for the appropriate bearing group
c. Condition Code—must be valid 1-digit code for bearings
14. Scroll to Section 4 Wheel Group 2 (Exhibit 56)
Exhibit 56. Field Registration for Wheelset (bottom)
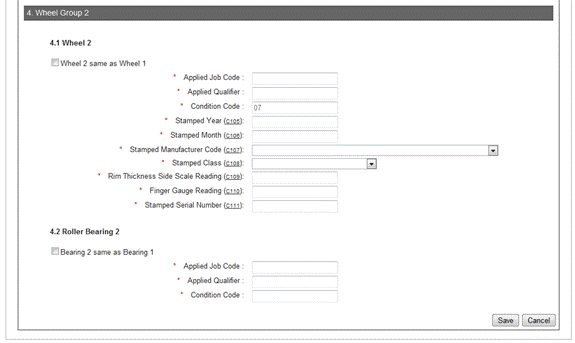
15. If Wheel 2 is the same as Wheel 1, check the checkbox and the fields are completed with the same data as Wheel 1. If not the same, complete as described in Step 12.
16. If Bearing 2 is the same as Bearing 1, check the checkbox and the fields are completed with the same data as Bearing 1. If not the same, complete as described in Step 13.
17. When all mandatory data is completed, select Save.
a. If validation fails, an error message is shown beside the invalid entry (Exhibit 57).
Exhibit 57. Field Registration for Wheelset (with validation error)
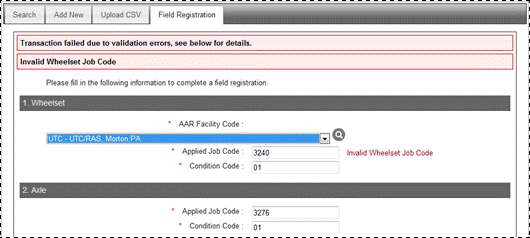
In Exhibit 57, the Wheelset Job code is incorrect (3240 instead of 3340).
b. If validation is successful, CEPM generates a unique Wheelset component ID (Exhibit 58).
Exhibit 58. Field Registration (Success message for Wheelset)
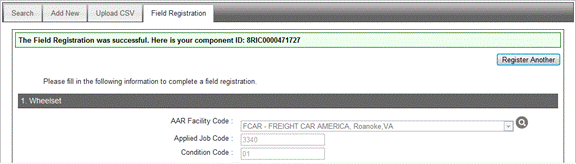
In Exhibit 58, the new component ID shown is 8RIC0000471727. The registered wheelset can now be associated with an Equipment ID as described in Wheelset Association.
18. To register another unbarcoded wheelset, select Register Another. The page resets for more input.
Note: It is usually best to search prior to starting a field registration to ensure there is no existing Component ID. Refer to Step 7.
![]()
Legal Notices | Terms of Service | Umler Reference Materials
© 2013 Railinc Corp. All rights reserved.